10 KiB
Application Load Balancer (ALB)
What is an Application Load Balancer?
An Application Load Balancer (ALB) operates at OSI Layer 7 (the application layer), meaning it understands HTTP and HTTPS traffic and can make routing decisions based on the content of each request. When a client sends a request to the ALB's DNS endpoint, the ALB inspects the request and forwards it to one of the healthy registered targets in its target group, distributing load across multiple backend instances. This means you expose a single DNS name to the internet, and the ALB handles spreading requests across your backend — no single instance bears all the traffic. ALB also supports advanced routing rules (path-based, host-based), sticky sessions, and continuous health checks that automatically remove failed instances from rotation.
Lab Overview
| Resource | Name |
|---|---|
| Load Balancer | demo-ALB |
| Target Group | demo-TG-ALB |
| Security Group (ALB) | demo-SG-ALB |
| EC2 Instance 1 | Demo-EC2-ALB-1 |
| EC2 Instance 2 | Demo-EC2-ALB-2 |
| Region | ap-south-1 (Mumbai) |
| Protocol | HTTP port 80 |
| Target type | EC2 instances |
Video Demo
Step-by-Step Walkthrough
Step 1 — Open the AWS Console
Log in to AWS and navigate to the Console Home. From the recently visited services or the search bar, click EC2 to start launching instances.

Step 2 — Launch EC2 Instances
2a — Set instance name and choose OS
In the EC2 dashboard click Launch instances. Enter a name for the instance and select Amazon Linux 2023 as the AMI.

2b — Configure security group and allow HTTP
Under Network settings, select an existing security group or create a new one. Make sure Allow HTTP traffic from the internet is checked so the web server is reachable on port 80.

2c — Add the user data script
Expand Advanced details and scroll down to the User data field. Paste the following script:
#!/bin/bash
# Use this for your user data (script from top to bottom)
# install httpd (Linux 2 version)
yum update -y
yum install -y httpd
systemctl start httpd
systemctl enable httpd
echo "<h1>Hello World from $(hostname -f)</h1>" > /var/www/html/index.html
What this script does:
| Command | Purpose |
|---|---|
yum update -y |
Updates all installed packages to the latest versions |
yum install -y httpd |
Installs Apache HTTP Server |
systemctl start httpd |
Starts the web server immediately after boot |
systemctl enable httpd |
Ensures the web server starts automatically on every reboot |
echo ... > /var/www/html/index.html |
Creates a simple HTML page displaying the instance's private hostname — this is how you can tell which backend instance responded when testing the ALB |
Set Number of instances to 2, then click Launch instance.

2d — Rename both instances
Once both instances are running, rename them to Demo-EC2-ALB-1 and Demo-EC2-ALB-2 by clicking the pencil icon next to each name.

Step 3 — Navigate to Load Balancers
In the EC2 left sidebar, scroll down to the Load Balancing section and click Load Balancers. Then click Create load balancer.


3a — Choose Application Load Balancer
On the Compare and select load balancer type page, click Create under Application Load Balancer.

Step 4 — Configure the ALB
4a — Basic configuration
Enter the following settings:
- Load balancer name:
demo-ALB - Scheme: Internet-facing
- IP address type: IPv4
- VPC: Select your default VPC (or your custom VPC)

4b — Select all availability zones
Under Mappings, select all available availability zones. This ensures the ALB can route to instances in any AZ and improves fault tolerance.

Step 5 — Create and Assign a Security Group
5a — Create a new security group
Click Create new security group next to the security group selector. This opens the Security Groups console in a new tab.

5b — Fill in security group details
Enter:
- Security group name:
demo-SG-ALB - Description: Security group for Application Load Balancer
- VPC: Select the same VPC chosen for the ALB


5c — Add inbound rule
Under Inbound rules, click Add rule. Set:
- Type: HTTP
- Source:
0.0.0.0/0(allows all internet traffic on port 80)
Then click Create security group.


5d — Select the new security group in the ALB config
Go back to the ALB creation tab, refresh the security group list, and select demo-SG-ALB. Scroll down to continue.

Step 6 — Configure Listener and Target Group
6a — Set default listener action
Under Listeners and routing, the default listener is HTTP port 80. Set the Default action to Forward to a target group. Click Create target group to open the target group wizard.

6b — Configure target group basics
In the target group wizard, set:
- Target type: Instances
- Target group name:
demo-TG-ALB - Protocol: HTTP
- Port: 80
- IP address type: IPv4


Scroll down and click Next.

6c — Register targets
Select both EC2 instances (Demo-EC2-ALB-1 and Demo-EC2-ALB-2) from the available instances list, then click Include as pending below.

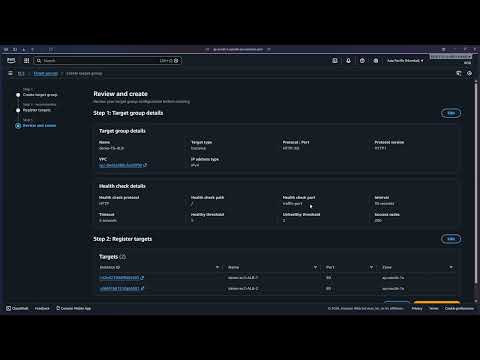
Click Next to proceed to the review step.

Click Create target group to finalize.


6d — Select the target group in the ALB config
Return to the ALB creation tab and select demo-TG-ALB as the target group for the listener's default action.

Scroll down and click Create load balancer.

Step 7 — ALB Created Successfully
The ALB is now created. You will see a success banner and the ALB will appear in the load balancers list with state Active once it finishes provisioning.


Step 8 — Test the ALB
8a — Copy the DNS name
In the Load Balancers list, select demo-ALB and copy the DNS name from the details panel at the bottom.


8b — Open in a browser
Paste the DNS name into your browser's address bar and press Enter. You should see a page displaying one of the instance hostnames.

8c — Refresh to confirm load distribution
Refresh the page. The ALB routes the second request to the other backend instance, and a different hostname appears — confirming the load balancer is distributing traffic across both EC2 instances.

ALB in action: The same DNS endpoint served two different responses from two different backend instances. This is exactly what ALB is designed to do — distribute incoming HTTP requests across all healthy registered targets, preventing any single instance from becoming a bottleneck.
Step 9 — Cleanup
9a — Delete the ALB
In the Load Balancers console, select demo-ALB, click Actions > Delete load balancer, type confirm in the confirmation field, and click Delete.


9b — Delete the security group
Navigate to EC2 > Security Groups, select demo-SG-ALB, and click Actions > Delete security groups.

9c — Terminate EC2 instances
Navigate to EC2 > Instances, select both Demo-EC2-ALB-1 and Demo-EC2-ALB-2, click Instance state > Terminate instance, and confirm.

All resources used in this lab have been deleted.